DIY Lip Scrubs! ♡

Another DIY! YAY!

Because of our Pinterest addiction lately, we thought of making some lip scrubs. If your lips have been dry for a while now, we now have the perfect solution for you. Again, the ingredients are very simple and most can be found at home. If you're interested in making one then here are the steps!

Option 1: Lush Inspired Lip Scrub

You will need:
Bowl
Measuring utensils: 1 tbsp and 1 tsp
1 teaspoon Olive Oil
1 tablespoon Honey
Optional: Food coloring of choice
Small containers
Optional: Petroleum Jelly
1 tablespoon sugar

Step 1:
Combine 1 tablespoon of honey and sugar in a small bowl.


Then, add 1 teaspoon of olive oil, 1 teaspoon of Petroleum Jelly and two to three drops of food coloring. Mix well.


Step 2:
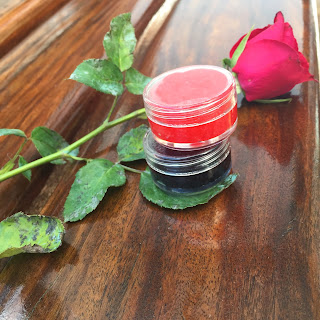
Using your spoon, place the completed scrub inside the container. You can use a smaller spoon or a chopstick to help place it inside easier. Our scrub required two containers.

Step 3: 
You're done! Just scrub it on your lips and feel extra moisturized!


Option 2: Vanilla Lip Scrub

This second scrub is based off of the first one, but we changed a couple of ingredients so that we could get this kinda vanilla-y and coconut-y scent while still being moisturizing. 

We basically did everything that we did with the first scrub, aside from adding a little vanilla extract for scent. We also switched out the olive oil for coconut oil because coconut oil is very nourishing and smells really great, especially when it has that slight hint of vanilla. The amount of vanilla extract that you'll add depends on how strong you want your lip scrub to smell. We only added a little, around two drops, and it turned out really well, complementing the coconut smell. The portion of the coconut oil stays the same: 1tbsp because we don't want to deviate from the original recipe too much in fear of the scrub becoming too liquid-y. Also, we're telling you guys now not to make too much since a little goes a really long way with these scrubs. We already tried it out and it works well and laves your lips feeling great. They make you want to eat them too! :)


Hope you liked this DIY! If you ever had the chance to try them, don't forget to show us at twitter! (@GeekyChiquitas)


DIY Puffy Paint Bracelets

Add some color to your life by trying out these puffy paint bracelets! It's super easy to make plus the materials are easy to find! You might even have them at home already.

Here's how to make them!

Materials You Need:
Multiple colors of puffy paint, string, ziplock (you can put paper inside for stability), toothpick and scissors

Option 1: Straight Lines

Step 1:
Draw a line and make it as straight as possible using a light-colored puffy paint. Make sure to place the line relatively in the middle so that you'll have space on both sides for the string and extra paint.

Step 2: 
Place the string on the line.


Step 3:
Choose 2 or more colors then just draw vertical lines continuously in alternating colors. 


Step 4: 
Once you're done, clean any smears or imperfections in your work using a toothpick.


Step 5: 
Drag your toothpick on both sides from top to bottom.


Step 6: 
You're done! All you have to do is to let it dry for 24-48 hours untouched, and you can start wearing it.


Option 2: Circles 

Do Steps 1&2 

Step 3:
Pick out at least three colors and bear in mind that one of them will be used for the interlocking hearts and not the circles. After this start drawing the circles.

Step 4: 
Clean any imperfections with the bracelet. Don't worry about there being a lot of mistakes because you can always fix them since the paint takes quite a long time to dry. 


Step 5:
Use the last color of puffy paint and draw smaller dots on top of every circle.

Step 6: 
Drag your toothpick down the middle of the bracelet, through the lines that the dots make. If there are any more imperfections just keep on fixing them with the toothpick, but don't forget to make sure that you take away any remaining paint on the toothpick so that you don't make a mess. 


Step 7: 
You're done! Don't forget to let it dry for 24-48 hours before using it.


Here's the final look!!

If you try these out, don't forget to tag us on twitter (@GeekyChiquitas)! We hope you enjoyed this tutorial and have fun making your own. :)

DIY Nail Art Tutorials


The perfect DIY nail manicure is here! Yesterday, my best friend and I got bored and tried painting our nails but since we thought that we could make our own nails and boost our creativity, we tried two kinds of nail arts.

The first nail art that we tried is the braid manicure.


Braid manicure is quite similar to braiding your hair but instead you're braiding your nails! Isn't that cool? 


The braid manicure only consists of three different colors and the pattern is all up to you! 

The second nail art we tried is the newspaper nail art. 

DIY 2014 Calendar


It's been a week since 2014 has started, and a better way to keep your year organized is by getting yourself a planner or a calendar! This year, instead of buying myself a new calendar, I thought of making and designing my own. Wouldn't it be fun if you have one personalized for yourself?

Step 1: Cut 6 long bond papers into half to get a total of 12 pcs of bond paper.


Step 2: Divide the paper into 7 columns and 5 rows.


Step 3: Leave a small space before making the columns with just enough space to write the day of the week.


Step 4: Write down the dates in each square.


Step 5: Write down the month on the side as creative as you can.


Step 6: Punch a hole on the space above.


Step 7: Get something will let you flip the pages.


You made it! Just as I said, you can always make a more creative calendar than what I did. There are a lot of ways to make one, you just need the proper materials. With making your own calendar, you can now list down the dates of your family and friends' birthday! You'll always remember them and make your loved ones feel special. :) 

DIY Shirt #2

Just as I promised, here is my second shirt DIY for the day! I used a normal green shirt then designed it to be somewhat ragged but still unique. 

This design can be paired up with your favorite shorts and is a great way to turn your unwanted tshirts into something fun! 

You can even wear this in parties just like what Kimi did before! 


Because I found this really cool, I'll show you the step by step tutorial below! 

Step 1: Cut a small part of the sleeves.


Step 2: Rip out the remaining sleeves. 


Step 3: Measure how long you want the strips to be then fold it. 


DIY Shirt #1

Holiday seasons are the perfect time for DIYs! How cool is it when a simple shirt can turn into something new? Today, I made two DIY shirts just by using simple materials. In fact, I didn't spend on anything. 

Basic tshirts are the bomb guys! You can transform it into anything you want. This DIY is one way to make use of your tshirts which you don't use anymore. 

 I really had fun making the shirts, so I'll share the steps with you! 

Step 1: Get a shirt that you are willing to cut. 


Step 2: Fold a part of the shirt.


Step 3: Cut the folded part. 


Step 4: Do the same until the bottom. 


DIY Halloween Bracelets and Hair Bow

Bows and bracelets are actually the two things that I'm addicted to right now. Because Halloween is coming, I thought about making a DIY blog post on how to make bows and bracelets suited for Halloween. These are also simple ways to spice up whatever costume you are going to wear.  Now, I'm going to show you the steps to make one. :)

DIY bracelet

Materials needed are: 


1. Nylon strings
2. Scissors
3. Different designs and colors of beads 

Step 1: Measure your wrist with the string them cut. 


Step 2. Double tie one end of the string.


Step 3: Think of a pattern for your bracelet then one by one insert the beads.


Step 4: Double tie the other end then tie to lock. It is now a bracelet. 


DIY Hair Bow

Materials needed are:

1. Scissors
2. Fabric
3. Bobby pins/ hair clip/ alligator clips
4. Needle and thread that matches your fabric
5. Ruler
6.Pencil
7. Sequence ( optional ) 

Step 1: Measure your fabric to be 9.5 by 7 inches, use your pencil to mark off your measurements.


Step 2: Cut your fabric at marked off spots. It doesn't need to be that straight because the ends will be hidden once the bow is done.


Step 3: Fold the fabric long ways, folding both ends in, making them overlap a little bit. 

Step 4: Now fold the outer ends in making them overlap like the last step.
Step 5: Flip over your fabric and pinch it to the middle to fold it into a bow. Play around with the fold until you are satisfied.

Step 6: Stitch the middle folds until it is secure. 

Step 7: After stitching, take a fabric scrap about the length of the bow for you center covering.
Fold it again like what you did with the large piece then wrap it in to sew.

Step 8: Slip a bobby pin in the back. You may also use other types of pins or clips but I only had a bobby pin so that's what I used. 

You may also add designs to your bow, just like what I did with mine :) 


Something that I learned while doing this is that you don't always need expensive and brand new things to make something look nice. The bow turned out pretty well despite the fact that we didn't spend much on it.

Thank you to Andrea Ellamil for helping me make the bracelet and bow. =)) 

-Beryl 


Popular Posts

Like us on Facebook

Stalk Us

2015 Reading Challenge

2015 Reading Challenge
Kimi has read 3 books toward her goal of 100 books.
hide